As you all know I love to receive photos of the gorgeous doll clothes outfits that you make with my patterns. I also appreciate your feedback because this is what enables me to learn, improve and ultimately help make your experience sewing doll clothes so much more enjoyable.
‘Sew’ in this blog I am sharing with you some of the feedback and tips that my customers have discovered work best for them when making my doll clothes patterns. You may find that these techniques also work better for you too.
Debbi wrote:
‘Hi Rosie,
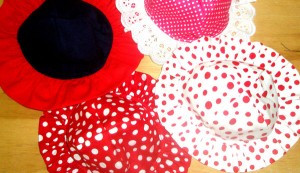
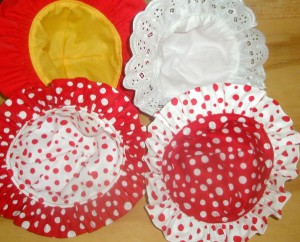
I hope you don’t mind me offering my latest tip. I have been making heaps of frilled hats and have started sandwiching the brim in between the hat and lining, right sides together, leaving an opening, and then turning the hat the right way. I slip stitch the opening closed and then top stitch. This makes them reversible, but with a contrast brim and I think it makes the inside of the hat a bit neater as well. I did try to take a shortcut by closing the opening with a topstitch but it wasn’t a good idea!! I have also made the hats with a slightly wider brim, and sometimes added a Suffolk puff or flower. If you do make a wider brim it’s best to take a bit of length out so it’s not so gathered.
Kind regards,
Debbi’
This method certainly gives the hat a neater finish and being reversible means it can be mixed and matched with lots more outfits. These hats look so cute! Thanks for this tip Debbi. If you would like to make your own filled hat you will find my Frilled Hat Doll Clothes Pattern for the 18 inch dolls here and for the 18 1/2 inch Cabbage Patch dolls here.
Peggy wrote:
‘Hi Rosie,
I have been spending quite a bit of time at my sewing machine these past few days. The weather has been so cold and wet that I had to cheer myself up by doing some sewing. There are plenty of household chores I should be doing but I would rather be sewing.
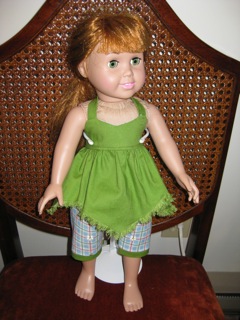
Anyway, I have made some of your patterns and doing that frayed edge (on the handkerchief top) was quite time consuming and a bit of a chore. I found that using a pin to help pull out the threads was not working as it was too hard to hold and the pin kept bending. My finger nails didn’t do well ether. I did decide to try the pointy end of my seam ripper and that worked better.’
Depending on what fabric you are using, the threads may be a little more difficult to remove so the seam ripper sounds perfect, thanks Peggy. I do think it was worth the effort though because this outfit looks fantastic. If you have a serger, drop the blade and try the rolled hem as it works wonderfully and is super quick too!
This Handkerchief top is one of my more popular doll clothes patterns, so if you would like to make one for your doll click here for the 18 inch doll clothes pattern and here for the 18 1/2 inch Cabbage Patch doll clothes pattern.
Finally, I received a question about how to ensure the edges of the fabric stay together evenly at the beginning and end of sewing when using the serger, especially when serging thick fabric.
I usually lift the presser foot and place the beginning of the two pieces of fabric that are pinned together directly under the needle of the serger rather than letting the feed dogs pull the fabric under the foot and up to the needles. This works for the beginning of the fabric but I don’t have a ‘foolproof’ technique for the end of the fabric other than sewing a couple of stitches by hand or with the sewing machine first. But this is an extra step that all takes time so it would be awesome if anyone has a tip that you could share with us on how you keep the ends of your fabric even when serging.
Also, if anyone has other tips they have discovered while sewing doll clothes and you would like to share them please email me and I will include them in future blogs. Or if you have other questions you would like answered, let me know.
Happy Sewing
![]()
By Rosie Saw


Those hats look great Debbi, I think I will give making bias binding a miss for a few days and run up a few hats for the girls for those hot summer days. ( Not that my girls go out into the heat) Well done they look terrific.
Hi Rosie. I’ve done the same thing as Peggy with the frayed ends. I tried using my nails, with no luck. So I started using my seam ripper. It works great for me and I love using this technique 🙂
Love those hats, I am a novice with sewing. I am just learning so I can make doll clothes for my 6 granddaughters. I am not sure I understand the instructions above for the hat and how to “sandwich” it in between and still be able to turn it right side out with the brim???? Maybe I just have to try it and it will make more sense to a beginner??? I am just practicing on my machine now and thinking maybe this week, I will cut out my first little outfit. LOL thank you for the tip. 🙂 I am sure sooner or later I will get it.
Hi Rachel, Great to hear you love the hats that Debbi has made. As a beginner sewer you may find my How to Make Doll Clothes video course very helpful as it goes over a lot of basics for sewing generally and then also lots of tips that make sewing doll clothes easier. It also has 8 free doll clothes patterns and the Frill Hat is one of the bonus patterns.
I’m sure if you have the hat pattern, follow the instructions and watch the videos showing how to make the hat you would then find Debbi’s explanation a little easier to understand. Instead of having the top of the hat and the lining together as you attach the brim, you ‘sandwich, the brim between these two layers (with right sides of the fabric facing each other) when attaching the brim. You will need to leave an opening so that you can turn it right side out and then hand stitch this opening closed and top stitch around as I do in my instructions to keep the two layers of the hat from separating. It is a little more fiddly than the way I show making the hat, but it provides a neater finish and also the added benefit of two different hats if you use different fabric for the lining.
Happy sewing
Rosie
Thank you so much for the great patterns and tutorials. I had 4 sons so never needed to make doll clothes, darn it, but now I have 4 granddaughters that are really into the 18″ dolls so I have started making them doll clothes and they love them. I love your patterns and will be trying them out