• Home
  • About
  • Contact
  • Login
  • Cart
Rosies Doll Clothes Patterns
  • All Rosie’s Doll Clothes Patterns
    • American Girl Doll Clothes Patterns
    • Cabbage Patch Doll Clothes Patterns
    • Doll Sizing
    • Testimonials
  • How to Make Doll Clothes Course
    • How to Make Doll Clothes Online Sewing Course
    • Who Will Benefit
  • Learn to Love Your Serger Course
  • Tips & Freebies
    • Free Sewing Patterns
    • Rosie’s Big List of Sewing Tips
    • Rosie’s Sew and Share Facebook Group
  • Our Blog
  • Customer Service
    • Contact Us
    • Frequently Asked Questions
    • Payment for Order
    • Delivery of Products
    • Refund Policy
Menu
  • All Rosie’s Doll Clothes Patterns
    • American Girl Doll Clothes Patterns
    • Cabbage Patch Doll Clothes Patterns
    • Doll Sizing
    • Testimonials
  • How to Make Doll Clothes Course
    • How to Make Doll Clothes Online Sewing Course
    • Who Will Benefit
  • Learn to Love Your Serger Course
  • Tips & Freebies
    • Free Sewing Patterns
    • Rosie’s Big List of Sewing Tips
    • Rosie’s Sew and Share Facebook Group
  • Our Blog
  • Customer Service
    • Contact Us
    • Frequently Asked Questions
    • Payment for Order
    • Delivery of Products
    • Refund Policy
  • About Rosie
  • Affiliate Program
    • Affiliate Resources
  • Buy 18 Inch Doll Clothes Patterns
    • American Girl Doll Clothes Patterns
      • American Girl Doll Accessory Patterns
        • American Girl 3 Way Shoe
        • American Girl Underpants
        • Multi Size Doll Diaper and Nappy Pattern
        • American Girl Fairy Wings
        • American Girl Doll Hat Pattern
      • American Girl Doll Beach Patterns
        • American Girl Doll Bikini and Tankini
        • American Girl One Piece Swim Suit
        • American Girl Sarong
        • American Girl Beach Bag
      • American Girl Doll Bedtime Patterns
        • American Girl Summer Nightie
        • American Girl Winter Nightgown
        • American Girl Winter Pajamas
        • American Girl Summer Dressing Gown
      • American Girl Doll Bottoms Patterns
        • American Girl 3 Way Skirt
        • American Girl Capri Pants
        • American Girl Overalls For All Seasons
        • American Girl Peasant Skirt
        • Cabbage Patch Kids Peasant Skirt
        • American Girl Tights
        • American Girl Sports Shorts
      • American Girl Doll Dress Patterns
        • American Girl Drop Waist Dress 5 Ways
        • American Girl Pinafore Dress and Skirt
        • American Girl Strappy Dress
        • American Girl 50s Vintage Dress
        • American Girl Summer Dress
      • American Girl Doll Glitz and Glamour Patterns
        • American Girl Ballerina
        • American Girl Doll Wedding Dress Pattern
      • American Girl Doll Tops Patterns
        • American Girl Blouse
        • American Girl Doll Trendy Transformable Top
        • American Girl Fun and Frilly Top
        • American Girl T-Shirt
        • American Girl Halter Top
        • American Girl Handkerchief Top
        • American Girl Crop Top
      • American Girl Doll Winter Patterns
        • American Girl Funky Fur
        • American Girl Fur Trimmed Jacket
      • American Girl Halloween Outfits Patterns
        • American Girl Witches Costume
        • American Girl Pumpkin and Tights
        • American Girl Fairy Costume
        • American Girl Angel Costume
    • Cabbage Patch Doll Clothes Patterns
      • Cabbage Patch Doll Accessory Patterns
        • Cabbage Patch 3 Way Shoe
        • Cabbage Patch Underpants
        • Multi Size Doll Diaper and Nappy Patterns
        • Cabbage Patch Fairy Wings
        • Cabbage Patch Hat Pattern
      • Cabbage Patch Doll Beach Patterns
        • Cabbage Patch Bikini and Tankini
        • Cabbage Patch One Piece Swim Suit
        • Cabbage Patch Sarong
        • Cabbage Patch Beach Bag
      • Cabbage Patch Doll Bedtime Patterns
        • Cabbage Patch Summer Nightie
        • Cabbage Patch Winter Nightgown
        • Cabbage Patch Winter Pyjamas
        • Cabbage Patch Summer Dressing Gown
      • Cabbage Patch Doll Bottoms Patterns
        • Cabbage Patch 3 Way Skirt
        • Cabbage Patch Capri Pants
        • Cabbage Patch Overalls For All Seasons
        • Cabbage Patch Tights
        • Cabbage Patch Sports Shorts
      • Cabbage Patch Doll Dresses Patterns
        • Cabbage Patch Kids Drop Waist Dress 5 Ways
        • Cabbage Patch Pinafore Dress and Skirt
        • Cabbage Patch Strappy Dress
        • Cabbage Patch 50s Vintage Dress
        • Cabbage Patch Summer Dress
      • Cabbage Patch Doll Glitz and Glamour Patterns
        • Cabbage Patch Ballerina
        • Cabbage Patch Wedding Dress
      • Cabbage Patch Doll Halloween Patterns
        • Cabbage Patch Angel Costume
        • Cabbage Patch Witches Costume
        • Cabbage Patch Pumpkin and Tights
        • Cabbage Patch Fairy Costume
      • Cabbage Patch Doll Shirt & Tops Patterns
        • Cabbage Patch Blouse
        • Cabbage Patch Fun and Frilly Top
        • Cabbage Patch Kids Trendy Transformable Top
        • Cabbage Patch T-Shirt
        • Cabbage Patch Halter Top
        • Cabbage Patch Handkerchief Top
        • Cabbage Patch Crop Top
      • Cabbage Patch Doll Winter Patterns
        • Cabbage Patch Funky Fur
        • Cabbage Patch Fur Trimmed Jacket
    • Mix and Match 5 or More Products and Save 20%
  • Customer Service
    • Contact Us
    • Currency Converter
    • Delivery of Products
    • Frequently Asked Questions
      • How to Access Your How to Make Doll Clothes Course and Bonus Patterns
      • How to Access Your Patterns and Step By Step Videos
      • How to Log In and Change Your Password
    • Payment for Order
    • Refund Policy
  • Doll Sizing
  • How to Make Doll Clothes Online Sewing Course
    • How To Make Doll Clothes Secret One
    • How To Make Doll Clothes Secret Two and Three
    • How To Sew Doll Clothes For Beginners: Sewing Kit
    • Preview Course Video Week Four – Sewing Curved (Convex) Seams
    • Preview Course Video Week One – Lets Get Started
    • Preview Course Video Week Six – Cutting Button Holes
    • Who Will Benefit
  • How to Use a Serger Online Course
  • Links
  • Log Out
  • Login
  • Lost Password
  • Patterns Catalog
  • Privacy Policy
  • Profile
  • r0IPN12
  • Register
  • Reset Password
  • Rosie’s Big List of Sewing Tips
    • Free Sewing Patterns
  • Rosie’s Blog
  • Team Management
  • Tell a Friend
  • Terms and Conditions
  • Testimonials
  • Thank You
  • Welcome
  • Welcome! What are you going to sew today?
  • What you get with Rosie’s Doll Clothes Patterns

Log in to view your videos
and print your patterns

login

Author Archives: Rosie Admin

Rosie's Blog |

May 26, 2020

| by Rosie Admin

Making Tiny Straps the Easy Way

Does turning tiny tubes frustrate you?  Then you’ll love this method.  One of the new ladies in my Facebook Sew and Share group recently purchased my How to Make Doll Clothes Video course and was posting photos of each of her finished bonus patterns.  She was so excited to be sewing and gaining confidence with each outfit but she had to admit she found turning the strap for the Halter Top tricky as she only had a tiny safety pin.  So I suggested she try the following method next time as it’s much easier than turning tubes after stitching the seam.

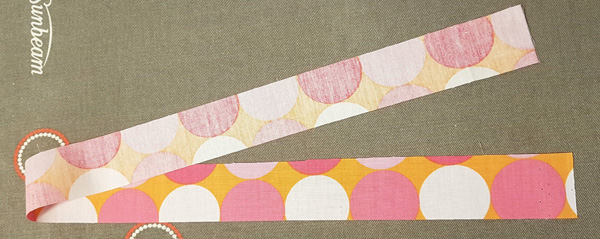
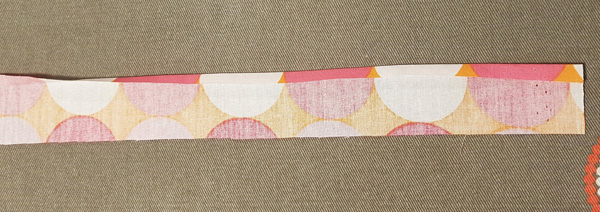
1. Cut your strap piece. The one I will be demonstrating with is 1 ¼” (3cm) wide and the finished strap will be approx. 3/8” (1cm) wide.

1. Strap ready to press

2. Fold and press one long edge in ¼” (6mm).

2. press first side in

3. Fold the other long edge in ¼” (6mm).

3. fold second side in

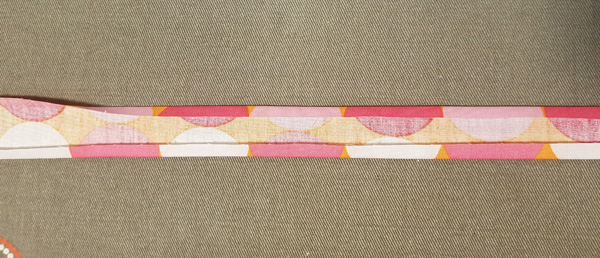
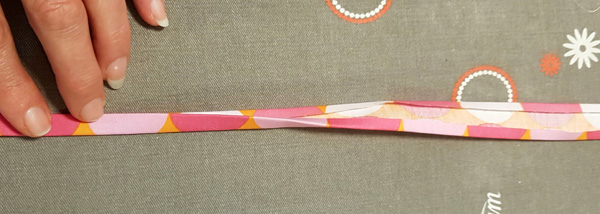
4. Fold the strap in half length-wise and press.

4. Fold strap in half and press

5. Using a straight stitch sew along the open side of the strap approximately 1/8” (2mm) in from the edge.
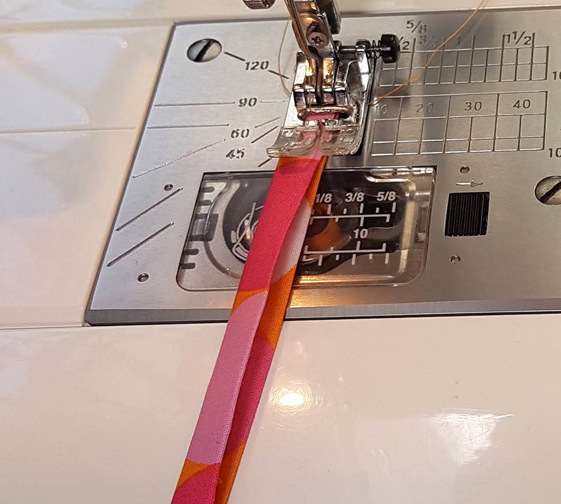
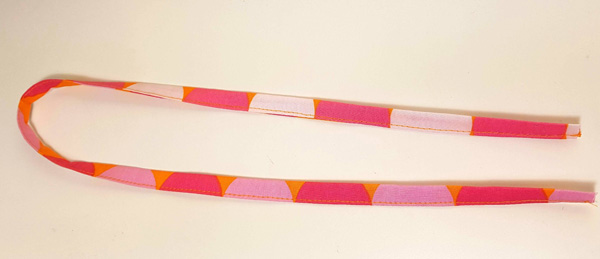
5. Sew Strap

6. Finished Strap.

6. Finished Strap

If you give this a try, please let me know how you go and if you found it easier than turning tubes to make straps.

Happy sewing

Rosie

Rosie's Blog |

May 18, 2020

| by Rosie Admin

Adjusting My 3 Way Shoe Pattern to Have Real Soles

I just love the creativity of the members of my Facebook Sew and Share group and I really appreciate how willing everyone is to share their ideas.

Monica is a very active member of this group and she posted her version of my 3 Way Shoe Pattern with ‘real’ soles, not fabric soles.  I thought they were so cool I asked Monica if I could share her idea in a blog.

Monica resized these boots to 90% of the original size so that they would fit her doll but regardless of what size you are making them, the steps will be the same.  I haven’t made these myself yet so will use Monica’s photos and directions that she sent me.

So here goes…..

How to Make my 3 Way Shoe with Real Soles

1. Cut out pattern pieces #1, #2 and #4 (if making boot with top trim) and make as per the original instructions until the end of step 7. Monica has used the top part of a sock for the top trim on this pair of boots – another clever idea.

2. Print out the Sole i.e. piece #3 about 10% smaller as you don’t need a seam allowance. Monica has reduced hers to 80% as she is wanting her finished shoe to be 90% of the original size.

3. You can place the doll’s foot on the sole to check for sizing – it should have at least 5mm all the way around the foot.

Checking sole size with doll foot

4. Cut away any excess. Here you can see how much Monica has cut away.

You will also notice that she has marked this sole with an ‘L’ for left. There is no need to distinguish left and right as many soles for doll shoes are made the same shape and designed to fit either foot.

Sole pattern trimmed to size

5. Before cutting the sole, it is a good idea to place this pattern piece inside the upper part of the shoe just to check that it is going to fit.

Monica is showing this step using a different shoe as she didn’t take a photo of the original shoe. She is using a paper clip to help hold the sole in place as she checks the fit.

Checking the fit for the sole

6. To make the inner sole, cut 2 pieces of thick cardboard or cork. If using thin cardboard cut 4 pieces and glue two soles together as you need a stiff sole to prevent them from bending when folding over the fabric.

7. Cut little V’s out of the seam allowance of the upper part of the boot making sure to not cut past ¼” (6mm).  Pinking shears work a treat here and it also stops the fabric from fraying.

8. Place a mark at the centre front and centre back of the sole and centre front and centre back of the upper part of the boot.

9. Place the sole inside the shoe matching the centre front and centre back marks. Fold the seam allowance over the cardboard/cork and glue in place. A hot glue gun is perfect for this as it dries really quickly.  Normal craft glue is not recommended for this as it is difficult to hold all parts of the seam allowance down while it dries.  As Monica told me, ‘that project ended up in the garbage, as there was glue all over and it didn’t want to stay where I wanted it.’

Inserting the inner sole

10. To make the outer sole cut two pieces of foam or cork. You can use whatever thickness you prefer, in this example Monica used a thin gym mat that she found at a $2 store. Glue these to the bottom of the boot.

gym mat used for external sole

11. If you wish to hide the edges of the glued soles, use a trim and glue around the shoe starting at the centre back or if you have marked and cut the soles with a left and right, start at the inside arch. Monica used the top part of a fringe trim but some other suggestions for the trim are thin strips of foam, flat shoe laces or grosgrain ribbon. The thickness of this trim will depend on how thick the sole is and the look you wish to achieve.

Finished boot

This method should also work just as well if making the shoes and Monica suggests using a fabric that is easy to fold over, otherwise it will be very hard to glue down.

Thanks so much Monica for sharing this awesome idea.

If you give this a try, please send me a photo and let me know how you go.

And if you have an awesome hack that you’ve used on one of my patterns and you would like me to share in a blog, please send me an email with details and photos.

Happy sewing

Rosie

3 Comments
Rosie's Blog |

April 29, 2020

| by Rosie Admin

Share and Tell April 2020

In my Facebook group we have a monthly Sew-Along where anyone can join in sewing an outfit or two, or three… using my patterns and we choose someone randomly to be our ‘Participation Winner’. This person gets to choose one of my patterns they would like added to their online membership for free. The theme for our January Sew-Along was ‘Alterations’ and WOW have we got some creative sewers in our group! It’s wonderful to see everyone’s confidence grow as they experiment with altering patterns to create amazing new outfits!

The first one I’m going to share was made by Tina and it was during our bushfire crisis here in Australia so she paid homage to our wonderful fire fighters by creating this wonderful outfit.

‘I’ve been sewing wildlife pouches for the past few weeks so have taken a short break to make this. This is inspired by all the firies, Australian and international, that are currently battling our devastating bushfires and the incredible job they are doing. I already had the material, so when this month’s theme was alterations, knew exactly what I was going to do.

I used the dropped waist dress pattern for the top – making the back 1 piece and cutting the front down the middle and adding extra seam allowance. I cut the collar on the fold to make it 1 piece instead of 2. I lengthened the sleeve to make long sleeves (bit too long though). For the pants, I used the overalls pattern, and cut it so it didn’t include the bib part. Hardest thing I found with this was cutting the reflective strips. They’re so thin and slippery, and my hand doesn’t work quite properly yet (surgery a while back). I think I need to get myself a rotary cutter.

At some stage I’ll probably attempt a helmet to go with it, but for now just a strip of material will suffice for the headband. In hindsight, I should have added an extra inch to the length of the jacket. Next time.. The stitching is a little rough, but I’m a little tired. It was a fun thing to do, and my first sew and share after joining in December. I look forward to many more.’

How amazing is this! And thank you for making wildlife pouches for all our injured animals Tina. xxx

Tina Ferguson emergency worker

The next two are by Debra. Firstly, she cut the bodice of the 50’s Vintage Dress so as to create two curved pieces and this creates a wonderful feature on the bodice. Great job Debra!  Then the second alteration she did was to shorten the Angel pattern and cut across the top off to create a bodice which she did in a contrasting fabric and lined.  Another wonderful idea.

Debra 50's vintage dress

Debra pattern

Debra Sharon Angel altered

Laurie drop waist dress

Laurie found a picture and used it as inspiration to create this adorable 1920’s dress.

‘I chose pay homage to 1920 in the first month of 2020. I used the Drop Waist Dress pattern and altered the neck by 1/4″, made the top pieces 2″ longer, and the skirt is 1/2″ longer and only as wide as the top. No gathering! Keeping to the 20’s theme, the dress is made from an old pillow case and it’s long so she can wear it to church all year. Since it’s white (although it looks blue) it is not a dress for school or play. The inspiration drawing is from a Google search.’

I love it Laurie and it’s wonderful to see you altering a pattern to achieve the look you want.

Monica has also been busy and had many entries in the January Sew-Along. The following are a couple of my favourites.

‘Belinda is wearing an evening dress. Used the upper part of the Swim suit (resized to 110%) and changed it into a long dress.  The Summer Dressing Gown shortened to just over the hips and the Pyjama pants, as patterns for a judo outfit.’

I seriously would never have thought to use my Swim Suit as the bodice for a dress, but why not? And the judo outfit is perfect! Love your creativity Monica.

Monica bathing suit

Monica Dressing gown


Now, how cute are these little pyjama sets that Helen has created combining two of my patterns! ‎

‘Summer shorty pyjamas…….Summer Dress made to peplum length and Winter Pyjama pants made into shorts. Rotten fish are swimming in all directions….I used new pattern pieces for the bodice of the mermaids and forgot to lower the neckline!’

I love it Helen and don’t worry about the fish, they usually swim in whatever direction they want!

Helen summer dress pjs

And the last one I just had to include was this reversible Dress by Susan.

‘Fun dress, used a child friendly fabric (Fat Quarter) and added a band of that fabric to the skirt of the Summer Dress pattern. Dress is fully reversible, fun on one side, party dress on the other. Truth, the lace is to cover up poorly placed seams.’

Wonderful idea Susan and shhhhh, if you don’t tell anyone about the seams, they won’t notice!

Susan summer dress 1

susan summer dress 2

susan summer dress 3

Hope you found some inspiration in these creations and if you would like to join in with our monthly Sew-Along please come and join my Facebook Group. It’s a wonderfully supportive and fun group and I’m so honoured to be part of it.

Until next time, please stay safe and Happy sewing

Rosie

10 Comments
Rosie's Blog |

April 18, 2020

| by Rosie Admin

Get My How to Make Doll Clothes Online Course at Half Price

Here in Australia and I understand in many parts of the world, many families are home schooling for the very first time and I know a lot of parents are stressing about having to become teachers. I want to help take some of this pressure off and offer my Learn How to Make Doll Clothes Online Video course at half price. That brings it down to just USD$18.50!

My goal is to help these families have some fun and learn a new skill at the same time. Mum, or Dad, if you don’t know how to sew and are worried about not being able to teach your child, don’t stress, my course has lots of information for the beginner sewer and you can both learn together. I explain different types of fabrics, how to use your sewing tools, how to sew basic stitches, sew seams, casings and much more.

The course is separated into 6 modules which have lots of short videos so as to keep your child interested. You can work at your own pace and stop whenever you like, then pick it up again when you’re ready.

50% Off Learn How to Make Doll Clothes Video Course

Included with my course are 8 doll clothes patterns to get you started (9 if you count the tights pattern that comes with the Pumpkin costume). You can get these patterns in the 18 inch American Girl size or the 18 ½ inch Cabbage Patch size. All these patterns have step-by-step video instructions where I show you how to make the outfit.  We start with the sports shorts which allow you to practice sewing seams and hems and create a casing, then you can move onto sewing and clipping curved seams with the cute little crop top.  The halter top has you practicing making and turning tubes while the sarong is ideal for practicing curved hems.  And that’s only half the bonus patterns.  Remember, you can work at your own pace and make more than one of the same pattern if you wish to practice a technique some more.

Now if you don’t have children to homeschool but would still like to take advantage of this offer, you are most welcome to.

‘Sew’ if you’re ready to get started and have some fun time together with your children, click here to add my How to Make Doll Clothes Online Video course to your shopping cart and use coupon code HOMESCHOOL to save 50%.

Offer expires April 27, 2020.

If you’re still not sure if this is right for you, click here to find out more.

Until next time, please stay safe and Happy sewing

Rosie

Rosie's Blog |

March 23, 2020

| by Rosie Admin

Making Sewing with Knit Fabric Super Easy

There was a discussion in my Facebook Group recently where some ladies were saying how they find sewing with knit fabric difficult because fabric either gets jammed down in the feed dogs at the beginning of sewing (see my blog – Is your sewing machine eating your fabric when you sew? for tips on this) or it stretches so much the garment goes all out of shape.

I knew the lady who started the conversation had my Trendy Transformable Top pattern so I directed her to one of the step-by-step videos that accompany this pattern as in this video I shared a great tip that helps prevent the fabric from stretching when hemming knit fabric and this same technique can also be used when sewing a seam.

Because there was so much discussion about this, I decided to share this part of my video in a blog in the hope that it helps many of you become more confident when sewing with knit fabric.

Let me know if this helps and please if you have other tips, feel free to share them in the comments below.

Happy sewing

Rosie

14 Comments
Rosie's Blog |

March 15, 2020

| by Rosie Admin

Share and Tell March 2020

Opps, I’ve just realised I didn’t release my Share and Tell blog for February so here it is, better late than never!

Oh, I do love sharing all your photos in my Share and Tell blog because it’s wonderful to learn about your experiences and see all the gorgeous outfits you create. I hope you enjoy reading the stories and maybe even inspired to try some of these patterns and alterations too.

Firstly, we have a beautiful Christmas Winter Nightgown from Sandra. I love the plaid look and how gorgeous is the matching Christmas stocking?

‘I am extremely proud and happy with this Christmas nightgown. It wouldn’t have been possible without your videos! I’m confident that my granddaughter will love it.’

I’m sure your granddaughter was thrilled to receive it in her Christmas stocking Sandra!

Sandra Chabot winter nightgown

Kim First doll nightgown

Kim is new to sewing and I’m so excited to see her first doll dress. As you can see, she did an awesome job and even added a ruffle at the hem! No wonder your granddaughter said WOW!

‘Hi Rosie, I made this for first time using your Summer Dress pattern. My granddaughter exclaimed, WOW, grandma!! I watched the videos and understood what the pattern was not totally clear about. I’m a visual learner and new to sewing.’

I just had to include this photo from Martha who has been having fun creating pretty Christmas dresses for her doll family using my Drop Waist Dress pattern and also combining it with the 50’s Vintage Dress skirt.  The results are amazing, especially with all the fancy trimmings and embellishments.  This reminds me so much of the 1920’s.

 ‘Merry Christmas to all from Mrs Joseph (Gwendolyn) Acosta and her oldest two daughters, Luisa and Magadalena.
Their dresses are Drop Waist Dress with pleats(!) on Luisa and a multi-layer skirt on Magdalena. Gwen is wearing Drop Waist Dress bodice and 50’s Vintage multi-layer skirt. – Martha’

I’m sure the dolls all had a wonderful Christmas Martha, thanks for sharing your photo.

Martha John drop waist dress alterations

Wedding Dress Catherine Rose

Catherine has been super busy making Wedding Dresses, complete with veil, petticoat and bouquets, for her granddaughters and I just LOVE the lace overlay on the skirt.  The scalloped edges are absolutely gorgeous.

‘Made 4 Bridal outfits for my granddaughters for Xmas. This one is from Rosies pattern.  Made the 4 veils and 3 bouquets and 3 petticoats from Rosies instructions.’

I bet your granddaughters were thrilled to receive these Catherine.

Looks like Tina has been reliving the days she was making dance costumes for her daughters and I’m loving the result.

‘I bought this Australian Girl doll at a charity store for $2. I was really lucky as apart from her hair which is a little unkempt, not unlike my own daughter’s at times, she is in really good nick.  She didn’t have clothes, so I made her a ball dress by adding about 4 inches to the bottom of the summer dress and widening the neck line a little (although I think I could have clipped the curve a little more there as it is pulling slightly). The net already had ab sequins on (old dance fabric) so I added a few flowers from the lace onto the bodice and embellished those and the waist trim with ab crystals from my stash. (literally still have 1000’s from the girl’s dancing days!) Think I might do the same around the bottom of the dress – forgotten how much fun it was to stone dresses. Now to get her some shoes as she is barefoot at the minute.’

It’s amazing how a little bit of bling can transform an outfit into something truly stunning – even when your doll has messy hair and no shoes!  Can’t wait to see what you make next Tina.

Summer Dress lengthened to make a ball gown Tina cropped

Summer Dress and Hat Wendy cropped

There’s something about the red and blue colour combination that always looks smart and Wendy has done it beautifully by adding the blue trim to both the Summer Dress and the Frill Hat.  And how clever is she making this cute shabby chic flower as an embellishment too!

‘I made my first hat and another summer dress with a shabby chic flower.’

Great job Wendy.

And finally, check out these super cute gnomes that Linda made using my Winter Pyjama Pants and Trendy Transformable Top with the addition of elastic at the writs.  She’s also been very creative and made the beard, hats and belts herself.

They look fantastic Linda!

Linda gnomes cropped

Sorry you had to wait so long for this blog but I do hope it has inspired you all.

If you would like to see more inspiring photos and get some great ideas for altering my patterns, please join my Facebook Group as we have lots of adventurous members who are loving altering my patterns to create beautiful outfits for their dolls.

Happy sewing

Rosie

8 Comments
Rosie's Blog |

February 12, 2020

| by Rosie Admin

Crazy Clearance Get $20 OFF my How to Make Doll Clothes DVD Set

WOW!! I sure must be crazy!

For the first time ever, I’m offering my Learn How to Make Doll Clothes DVD set for the same price as my online course. Yes, for two weeks only (or while stocks last), receive $20 OFF the price of my DVD set which brings it down to a crazy $37!

Whether you’re a beginner or expert sewer, you’ll find making doll clothes so much fun when I teach you all my tips and techniques that I’ve discovered over the years that make sewing small doll clothes super easy. I cover the basics of sewing which is perfect for the beginner, as well as more advanced techniques such as attaching collars, working with elastic and attaching ruffles.

How to Make Doll Clothes DVD Course Clearance

How to Make Doll Clothes DVD Course Sale

Included in this set are 10 DVDs with all the course material and step-by-step video instructions showing you how to make the 8 bonus patterns (9 patterns if you include the tights pattern that comes with the Pumpkin costume) AND 1 CD with all the bonus pattern pdf pattern pieces and written instructions.

If you would like to know more, watch some free preview videos from my online sewing course and read what others are saying about this amazing course, then visit my How to Make Doll Clothes Online Sewing Course page.

This crazy discount also applies to the Best of Both Worlds with both the DVD set and online access to all course material and bonus patterns bundled together for only $47!

To take advantage of this awesome offer, simply enter DVD$20 in the coupon code box during checkout. Offer expires Feb 27, 2020 and cannot be combined with any other offer.

Happy Sewing

Rosie

Comment
Rosie's Blog |

January 29, 2020

| by Rosie Admin

Cabbage Patch Kids Peasant Skirt Pattern Release

Following the successful release of my 18 inch American Girl Peasant Skirt pattern, I’m thrilled to now be releasing my Peasant Skirt pattern for 18 ½ inch Cabbage Patch Kids.

It’s another very flexible pattern as it gives so many options. You can make it a short or long skirt, depending on how many layers you use and then do you prefer the ruffle sewn in the seam or top stitch on top for a more textured look?

It’s such a pretty pattern and you can easily change the look by making the length of each layer shorter or longer and experimenting with different prints and colour combinations.

Cabbage Patch Doll peasant skirt ruffles in seam

Cabbage Patch Doll peasant skirt top stitched ruffles

Using a knit fabric, like the blue one to the left, means there’s no need to hem any of the layers or finish off seams, which makes it even quicker to sew.

As an added bonus for those who have a serger (overlocker), I show you how to do the gathering and then sew the gathers into the seam using your serger (overlocker) so you’ll have this skirt made in no time at all!

At only US$6.95, it’s fantastic value. Click here to get your pattern and start creating this beautiful skirt today!

Happy sewing

Rosie

Comment
Rosie's Blog |

January 16, 2020

| by Rosie Admin

18 Inch and American Girl Peasant Skirt Pattern Release

I always get excited when I release my first pattern for the year and this year I’m super excited because I love the flexibility of this Peasant Skirt pattern for 18 inch and American Girl dolls.

It’s such a pretty pattern and can be made with either two or three layers making it a short or long skirt. Then sew the ruffle in the seam or top stitch the ruffles on top for added interest. It’s also super easy to create different looks by playing around with the lengths of the layers.

You can even use contrasting or complimentary colors or prints for each layer to really create an impression!

American Girl doll peasant skirt ruffles in seam

18 Inch doll peasant skirt topstitched ruffles

If you use a knit fabric like I have here on the blue one, you don’t have to hem it or finish the top edge of the ruffle. There’s no need to finish off seams either, so it then becomes a really quick sew.

As an added bonus, I show you how to use your serger (overlocker) to do the gathering and then sew the gathers into the seam. Oh, I do love my serger as it just makes everything so much quicker and neater!

At only US$6.95, it’s great value. Click here to get your pattern and start creating this gorgeous skirt today!

Happy sewing

Rosie

Comment
Rosie's Blog |

December 1, 2019

| by Rosie Admin

Merry Christmas 2019

I honestly can’t believe that I’m sitting down to write yet another Christmas blog, where has the year gone? I don’t know about you but time is going WAY too quick these days and my grandson is already 10 months old!

This year again saw the release of four new patterns in both the 18 inch American Girl size and the 18 ½ Cabbage Patch sizes. I started with the Strappy Top, an easy pattern to get me started back into the swing of videoing and then came the Drop Waist Dress 5 Ways. This has been one of my most popular dresses and it was certainly a challenging one for me to film as I had so many different options to demonstrate, then poor Brad had to organize it onto the website and make sure that everything flowed to the next step correctly. Thanks for your patience on this one Brad. ?

The Trendy Transformable Top was my next pattern and again, I couldn’t resist giving you several variations on this one too! Then a surprise pattern was the Multi-Size Nappy. I say, ‘surprise’ because I hadn’t planned on doing this one due to the 18 inch dolls not normally wearing nappies. But after a few requests from customers to share the pattern I use to make nappies for my Doll Clothes website, I set about filming and I have to say a thank you to those who encouraged me to make this one as it has proved to be another popular pattern.

Rosies Doll Clothes Patterns Christmas 2019

The thing that has brought me the most joy this year, has undoubtedly been watching all the members of my Facebook Sew and Show group supporting each other on their sewing journey and sharing their creations with us all. We have nearly 1200 members now and I love the way this group has become more like an extended family with people from all over the world bonding over their love of dolls and sewing doll clothes. I am so proud to be part of this group and would like to thank everyone who contributes because you are what makes this group so special.

A special thank you to all my awesome customers because without your support and feedback, I would not be here. I wish you a wonderful holiday season with your families and I’m excited about what we have in store for 2020!

Merry Christmas

Rosie

28 Comments

Post navigation

« Prev 1 2 3 4 5 … 25 Next »

View my #1 Secret on How to Make Doll Clothes the easy way and Save a Fortune!!

How to Sew Doll Clothes Course FREE Tutorials

Privacy Assured: Your email address is never shared with anyone.

Testimonial

Laurie

“I thought I knew how to sew but I learned a lot from Rosie’s How to Make Doll Clothes video course. I now do a lot more flat sewing on other patterns and it makes such a difference. Also, her way of doing elastic is fantastic. I use some other patterns for doll clothes, but I always think about how Rosie would put it together and do it her way. Love Rosie and her great support.”

Laurie – California, USA

Rosie’s Blog Recent Posts

  • April 2023 Sew-Along
  • March 2023 Sew-Along
  • February 2023 Sew-Along
  • January 2023 Sew-Along

Blog Post Archive

Payments Rosie accepts….

PayPal Logo

Stripe
Terms and Conditions
Affiliate Program
Privacy Policy
Links

© 2022 Rosie's Doll Clothes Patterns, a unit of Component Enterprises, Inc.