There must be a lot of hungry sewing machines out there as I have received the same question twice in the last couple of months so figured it would be a good idea to share my tips on how to keep your munching machines under control.
When sewing doll clothes you are often sewing tiny seams with small bits of fabric and if you are not careful, your machine will gobble up your fabric as you begin to sew. To avoid this happening there are a number of things you need to do. Firstly, it is really important to ensure that you have a good needle because if it is blunt or bent, it will not go through the fabric easily and tend to want to push it down into the needle plate.
Next, you must hold tightly to the needle and bobbin threads as you begin to sew. Doing this not only helps to keep the fabric on top of the needle plate, it also prevents the threads from tangling and nobody wants that. If you are still having difficulty, try moving the beginning of the fabric past the needle a little further toward the back of the machine before lowering the presser foot.
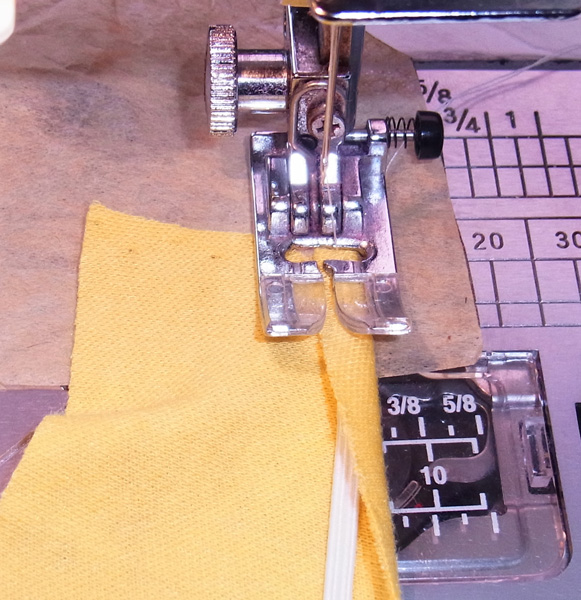
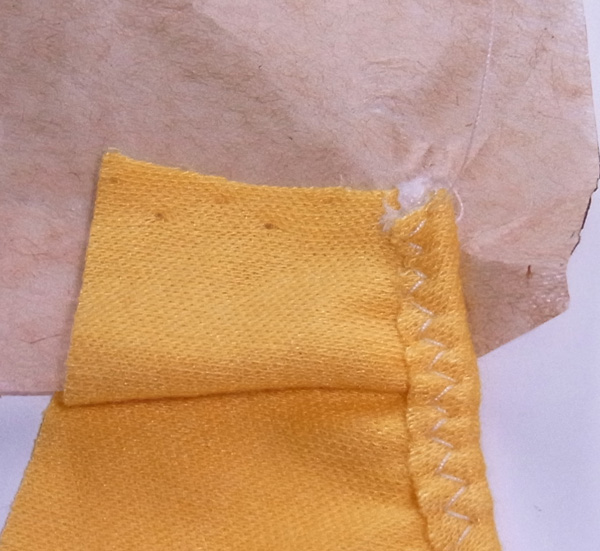
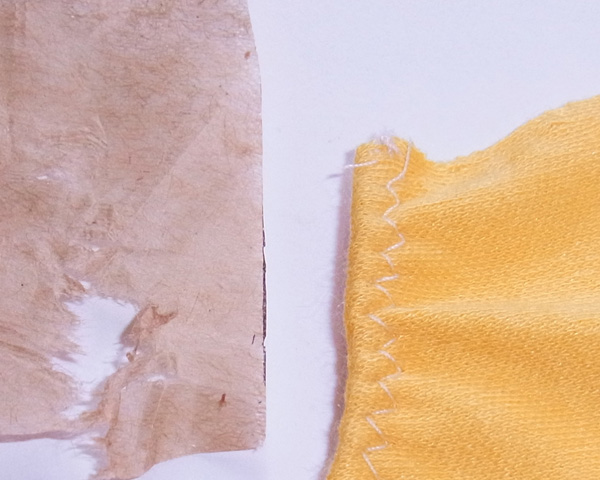
Another trick is to use a piece of tissue paper, or even normal writing paper, under the beginning of the fabric, drop the presser foot, hold the threads and start sewing. When you’re finished sewing, simply tear away the paper. This method also helps to stop your sewing machine munching the end of the fabric when you do your reverse stitches if you go too close or past the end. The photos below show this technique when attaching elastic to the beginning of the leg in my underpants pattern.
Another tip that Katy, one of my wonderful customers, told me about was to start on one piece of double fabric and then feed the fabric you are sewing with into the machine immediately afterwards, like train carriages. I can certainly see how this would work, but as Katy said it can be fiddly.
I hope these tips help to keep your munching machine under control and ultimately makes sewing your doll clothes easier. Thanks Katy for your tip and happy sewing to you all.
Happy Sewing
![]()
By Rosie Saw


Wow, I never heard of using paper to begin sewing. Great idea. I have a problem often when attempting to sew forward and backward at the beginning of a seam. I find that I have to begin about 1/4 of an inch in to keep the fabric from bunching up. Also, I was having a problem with a tangled mess of thread underneath the beginning of my seams as well. Rosie, your tip to hold both threads tightly is the only thing that seems to prevent it. I really like this question and answer forum. It’s nice to know that others have some of the same problems.
I was sooooo glad to see this as your new tip. I was going to ask about this awhile back and ended up having to do a few other sewing projects and never got around to emailing you. I have held the strings and sometimes the machine still wants to eat the fabric. I never thought of using paper!! I will definitely try that next time! Thank you, Rosie! I always look forward to your newest sewing tips and blogs. You are wonderful! 🙂
Thanks Rosie, I have used them all for many years, especially since I have a Diamond Embroidery Machine so it has a larger opening than just a straight stitch.
Hi Rosie,
Do you have a place where we can post pictures of the outfits we make? I love all your tips…..and reading your website. This fall I hope to take your course in sewing, although I seem to be getting much better….now I am going to tackle shoes and boots……this is soooo much fun. My granddaughters love my sewing!!!!
Thanks Marian
Hi Marian, it’s fantastic to hear that you are enjoying sewing doll clothes and that your grandchildren love your sewing. If you email me your photos I will make sure that they are included in my blog or you can upload them to my facebook page Can’t wait to see them.
Happy sewing
Rosie
Thanks for the wonderful feedback ladies 🙂
I use 1.5″ squares as starters/enders sewing 2 together. It’s easier than hanging on to just the needle and bobbin threads. Eventually these will all be sewn together in a postage quilt. So far I have 3 strips of 6 x 100 squares and many other pieces sewn together but not yet in the long strips. Actually sewing a piece 18 x 20 or thereabouts and putting a small border around would make a nice antique looking doll quilt.
Yes it is! Thank you
I found tear-away stabilizer at a local fabric store. It works wonders! It was .97/yard – 18″ wide. It really made sewing clothes for my granddaughters dolls much more enjoyable!
I cut it into 1″ wide strips and use it to start a seam, end a seam, and under the zig-zag stitching for edging facings.
Yes, Tear-away is fantastic for many things. Thanks for sharing this tip Grandma Ruth.
Rosie, I just found your site. So many wonderful tips! Thank you for taking the time to do your blog. I have a problem I need help with, if you or your readers have any suggestions. I purchased on eBay a 1970’s Horsman Doll Shoppe kit for a 12″ Toddler. Everything was fine until I tried to put the arms on. The body of the doll came with button-type joints to which the full vinyl arm is supposed to attach. However, the vinyl won’t give enough to go over the button aperture. Any suggestions anyone? I would really like to finish this cute doll. Again, thanks for your site and all the wonderful information. Hoppy Easter!
Hi Jeanne, Glad you found my blog. Have you tried heating the vinyl with a hairdryer? This may make the vinyl soft so that it can stretch over the button aperture. Just be careful to not heat it too much. Would love to know how you get on. And Hoppy Easter to you too 🙂
Thank you for this tip! I have been going crazy trying to make a little fancy blouse for my FR fashion doll out of very lightweight silk-like material and my machine keeps eating it. Now I can complete my project.
My pleasure Joyce.
Happy sewing
Rosie
I accidently bought the wrong size coffee filters, instead of throwing out I use these to start my sewing
Yes, they’re perfect for this Debbie. 🙂
I have a straight stitch foot for my machine just for this very reason but a 1/4″ foot should work easily as well.
Fantastic tips! I was having this problem too….no more. Thanks heaps!
You might have to adjust the tension, too, depending on what fabric you’re using.
Yes, that’s a great point Cara, thanks for sharing. 🙂
Most probably due to tension and Incorrect threading
It can be that, for sure! Also make sure to replace your sewing machine needle every few projects.