I received an enquiry from Yvette who was desperate to solve a problem she was having.
‘HELP. I just started trying to make doll clothes. I am using 10 oz cotton Lycra blend for this dress. My question is how do you apply Velcro to the back of the dress without a pucker? I do not want to cut the dress ALL the way down in order to get a flush or flat seam. I have just 2 seams down the two sides of the dress and wanted to keep it that way. Can you help? I have been trying to figure this out for 2 weeks. Thank you, Yvette’
Well, I wasn’t entirely sure what Yvette was referring to when she mentioned the ‘pucker’ so replied with suggestions on how to prevent stretching when sewing on stretch fabric. But I missed her point altogether. What she really wanted to do is to cut the fabric part way down the back and attach Velcro so that it joins back together just the way it was before the cut.
No problem, the solution is:
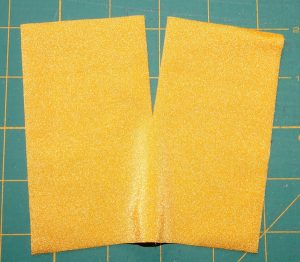
1. Cut the fabric down the length that you require the opening to be.
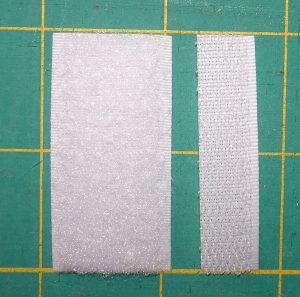
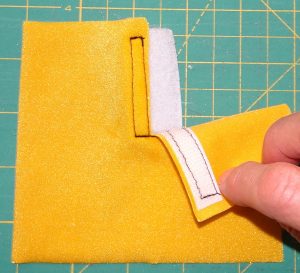
2. Take a 1 inch (2.5cm) wide Velcro strip and cut it the length that you want it. It must be long enough to go just a little below your cut in the fabric. Now take the hook side and cut it lengthwise down the middle so that you have a piece the same length as the loop side but half the width.
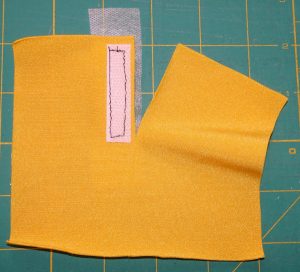
3. Attach the hook strip of Velcro to the wrong side of the fabric on one side of the opening ensuring that it extends below the cut in the fabric.
I have used a dark colored thread so you can clearly see where I have stitched, normally I would use white on the Velcro side and a color to match the fabric on the other side.
4. Attach the loop side of the Velcro strip to the hook side with the excess Velcro hanging over the cut edge of the fabric.
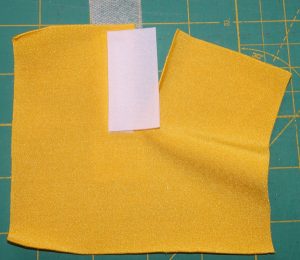
5. Close the fabric so that the two edges are together and stitch the loop side of the Velcro to the other side of the opening.
This may be a little tricky if the garment is small. If that is the case stitch the loop side of the Velcro to the other side of the fabric without it being fastened to the hook side. Then close the Velcro together ready for the next step.
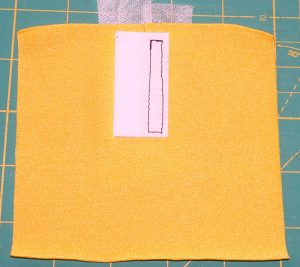
6. Stitch across the bottom of the closed Velcro strips several times i.e. forward, back and forward again just like when you secure the end of stitching on a seam. This will provide extra strength to the bottom of the cut to prevent it from being stretched when opening the garment to dress and undress the doll.
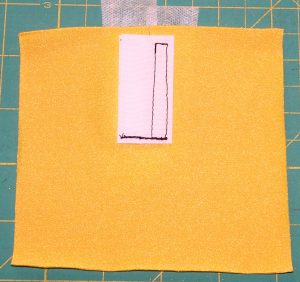
7. This photo shows the right side of the fabric. You can see that I have used Fabric Solvy to prevent the fabric from stretching as I attach the Velcro. I will now go and wash it away.
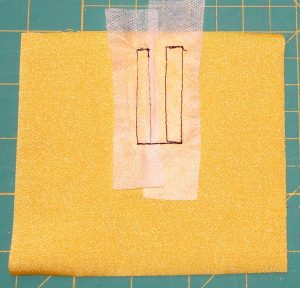
8. This shows the right side with the Fabric Solvy washed off.
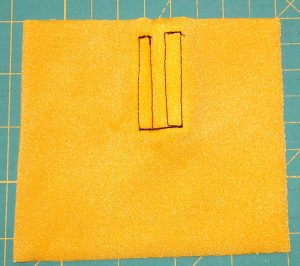
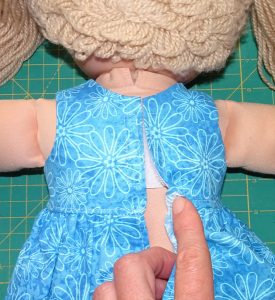
9. Now you can open and close the slit and there is no overlap or pucker.
‘OHH….You got it. You are smart. Thank you so much for responding to me. I was stuck until this was figured out. I can’t thank you enough. Have A great day!’
Looks like that was the solution Yvette was looking for…..Yay!
This will only work with fabric that doesn’t fray, such as Lycra, Polar Fleece, or knit and I can see it being used at the back of a leotard or swimming costume.
This technique of attaching Velcro is also handy when you have made a dress that has turned out too small in the bodice to allow for the overlap. By attaching the Velcro in this manner on to the back of the finished bodice you get a little over ½’ (12mm) extra to play with and this may be just enough to allow the dress to be worn by your doll and not thrown away in disappointment.
Hope this tip helps someone else too and remember, I have other great Velcro tips in my How to Make Doll Clothes video course.
If you have a special tip that you have discovered, please feel free to share it here as we’d all like to hear it too!


Thank you for this tip, Rosie. I remember when Velcro was first invented. IMHO, when it comes to ease of use, it sure beats the alternatives of zippers, buttons, or snaps for closures, and this is doubly true with doll clothes,
My pleasure Judy. Yes, I totally agree that Velcro is super easy and makes the ideal closure for doll clothes. 🙂
What a brilliant idea–yet so simple. Thank you.
My pleasure Valerie. I hope this tip comes in handy some time for you. 🙂
Thanks Rosie for sharing this tip with us. I know it will come in handy when I start sewing with knits and other stretchy fabrics.
My pleasure Pat. And remember, you can also use it when sewing with woven fabric to give you extra room on the bodice if you ever need to. Happy sewing 🙂
Wow !!!!!!
Thank you so very much for the tip !!!!
So, when I come across to that situation……. I’ll know what to do ??? Thank you for sharing all of your videos, and tips ?
My pleasure Kimberly. 🙂
What a cool idea. I never would have thought to make one strip of Velcro wider than the other to make it so that when you cut a garment a bit too small, it might still be salvaged. Thanks for posting this.
I’m glad you like this tip Nancyb. 🙂
Such a good idea Rosie…thanks for sharing!
My pleasure Julie. I use this technique often with the doll clothes I sell but have the larger piece of Velcro on top of the bodice so that it gives flexibility to the size of the dress and can be worn by various size dolls.
I wish I had seen this great tip sooner! I just gifted about 15 doll outfits to my granddaughter and this would have come in handy! ??♀️ I will definitely save this for the future:)
Thank-you so much,
Bev
I wish you had seen it earlier too Bev but glad you now know for next time.
Happy sewing
Rosie
Wow, thanks for this tip. I have been avoiding making clothes from the doll clothes patterns collected over the years. This I will try soon. Be well and Happy.
Great to hear you’re now ready to try this tip with all the doll clothes patterns you have. Just be warned, once you start sewing for dolls, you will be hooked! Happy sewing. 🙂