I have received a number of enquiries asking if I do smaller size doll clothes sewing patterns and the occasional request for larger doll clothes sewing patterns. Branching into other size doll clothes patterns is definitely something I would love to do in the future but I realize that many of you cannot wait until I get around to it. So I thought I would share a tip that may help you to adjust my existing doll clothes patterns that you already have so that you can use them with other size dolls. This blog applies equally to either my 18 Inch American Girl or Cabbage Patch Kids doll clothes patterns.
I wish I had of thought about this many years ago when I first started drafting my doll clothes patterns for Rosie’s Dolls Clothes, an online business I sold in 2021 after 17 years, it certainly would have made my job a lot quicker and easier.
Firstly and most importantly, you need to have access to a photocopier that can make copies in different sizes or know how to use your printer to reduce pdf pattern pieces. The next thing to do is have the measurements of the doll that your present patterns fit and the same measurements for the doll you are adjusting the pattern for. When resizing my patterns you will need the measurements for the American Girl doll or Cabbage Patch Kid and you can find these measurements on my Doll Sizing page. You then work out how much smaller (or larger) the new pattern needs to be as a percentage. To do this you divide the measurement of the doll you are adjusting the pattern for by the measurement of the doll of the existing pattern and then multiply by 100. Repeat this for each of your measurements.
The table below shows the measurements of the Cabbage Patch doll on my website that my Cabbage Patch doll clothes patterns fit and the Little Baby Born doll that I am wanting to adjust the patterns for. I am using cm as it is easier for me to calculate.
Cabbage Patch(existing pattern) |
My Little Baby Born(new pattern) |
% of original pattern |
|
Length |
44cm | 32cm | 32/44 x 100 = 72.7% |
Torso |
18cm | 13cm | 13/18 x 100 = 72.2% |
Waist |
31cm | 25cm | 25/31 x 100 = 80.6% |
Neck |
20.5cm | 15cm | 15/20.5 x 100 = 73.1% |
As the resultant percentages are between 72.2% and 80.6% I am going to use 75% as an average and the amount that I will be reducing my pattern to i.e. 75% of the original size.
Now go to the photo copier, find the reduce button, set that to 75% and take copies of all pattern pieces at this setting. Then make small adjustments where necessary. In my case above, I will add a small amount to the waist as I have reduced the pattern more than I should have on this particular measurement. Now make the outfit up using scraps of fabric and test it on your doll. At this point you can determine if any further adjustments need to be made.
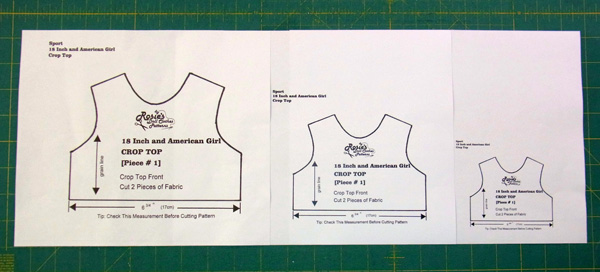
The following photo shows an original pattern on the left, then reduced to 75% of the original size and finally at 50% of the original size.
Original pattern, photo copied at 75% and 50% of original
If your doll was larger than the original doll clothes pattern you have, you would simply find the enlarge button and set it to the bigger size e.g. 110% to make the original pattern 10% larger.
You will notice that I did not worrying about the length of the arms or legs as these are easy to shorten or lengthen as necessary. If my original doll has an arm length of 14cm and the doll I am making the pattern for has an arm length of 12cm, I would simply adjust the smaller photocopied sleeve pattern so that it was 2cm shorter than the original sleeve pattern length. The same would apply for the leg measurement if you are making long pants.
Although this method does not take into account all measurements and is based on the premise that the proportion of the dolls are the same (which is not necessarily correct), it is a great method to use to get the basic pattern for you to start from and is much easier than drafting the pattern from scratch each time you wish to make a new smaller or larger pattern.
If you like this tip, I know you’ll love my How to Make Doll Clothes course as I show you tons more tips that take the frustration out of sewing small doll clothes which means you can enjoy sewing doll clothes for yourself or loved one instead of dreading/fearing it. As a special bonus, the course comes with 8 free 18 inch doll clothes patterns with full video tutorials so you will be on your way to creating a wonderful wardrobe for your doll in no time at all.
Webmaster’s Note: For some reason, Facebook doesn’t like the URL for this post. It won’t allow us to post it or even share it in Messenger. To get around the problem, we’ve created the very same post at a new URL. Both contain the same helpful resizing information. But going forward, that post will be the “official” one we share online. Because… Facebook. ¯\_(ツ)_/¯
Happy Sewing
![]()
by Rosie Saw

