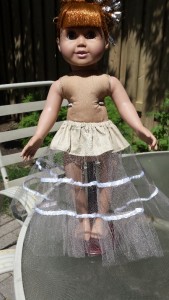
One of my wonderful customers and now friend, Sharon, purchased my 18 inch and American Girl 50’s Vintage Dress pattern and wondered if it would look nice with a petticoat under the long dress version. So she set about making this pattern and sent it to me as a special thank you for some help and encouragement that I had offered.
What can I say? I was truly touched by her kindness and enthusiasm and asked if I could share it with you all. Being the generous sole that she is, Sharon gave me her blessing as she would love to share her creativity.
This pattern will also fit the 18 ½ inch (46cm) Cabbage Patch dolls.
So let’s get started!
Materials
1. 24” X 4” (60 x 10cm) piece of neutral cotton or broadcloth
2. Half meter of neutral tulle (netting)
3. 5.6 meters of ¼” (6mm) neutral ribbon
4. 10” of ¼” (25cm of 6mm) elastic
5. Neutral thread
6. Scissors
7. Cutting mat, rotary cutter & quilting ruler is recommended when cutting the Tulle, however scissors can be used
8. Elastic puller or safety pin
9. Straight pins
Directions for cutting
1. Cut a 24” X 3 ¾” (60 x 9.5cm) piece of cotton or broadcloth
2. Cut a 3” X 36” (7.5 x 90cm) piece of Tulle
3. Cut (3) 3” X 60” (7.5 x 150cm) pieces of Tulle
N.B. I found these measurements perfect when displaying the doll on a stand and making the dress longer so that it touches the table. If you do not want this extra length, you may need to reduce the width of each piece by ¼ “ (6mm) and this will shorten the petticoat by 1” (2.5cm). It is better to have the petticoat at least ½ “ (12mm) shorter than the dress unless you specifically want the net showing.
If you are making this petticoat for the Australian Girl doll, please use the measurements as listed as the Aussie Girl is a little taller.
Directions for sewing
Make Casing
1. Make casing by folding the top piece of cotton over by ¾” (2cm) and crease with steam iron.
2. Now fold open and turn over very top by ¼” (6mm) do not steam over ¾” (2cm) crease. Press and turn over, steam casing seam in place.
3. Stitch carefully just catching the casing edge. Reverse stitch on both ends.
Gathering & attaching Tulle
1. Set machine stitch length to longest setting and on the 36” (90cm) piece of Tulle stitch two rows, one being just over ¼” (6mm) and the next row just under ¼” (6mm).
2. Pull on top threads and gather to make a 24” (60cm) long ruffle.
3. Pin to bottom of cotton and stitch between gathering rows being careful not to stitch over gathering threads. Use a regular stitch length with ¼” (6mm) seam allowance.
4. Now do steps 4 & 5 with the 60” (150cm) piece of Tulle gathering to 36” (90cm) in length.
5. Attach to 1st layer of tulle and stitch with regular stitch length ¼” (6mm) seam.
6. With remaining two pieces of tulle begin gathering first row. When you come to the last 4” (10cm) of tulle overlap with second piece and continue sewing. Repeat for second row.
7. Gather up to 60” (150cm) in length.
8. Pin to second row of tulle and with regular stitch length sew ¼ ” (6mm) seam.
9. Admire what you’ve done so far and pull out all your gathering threads.
Finishing seams & touches
1. Set machine to zig zag and finish your seam lengths.
2. Still on zig zag, stitch ribbon to the two middle seams. I lay the ribbon using the seam as a guide laying the ribbon over the centre of the seam.
3. Run your elastic through casing. Place straight pin at one side so elastic does not pull through the casing.
4. Stay stitch both ends once elastic is in casing.
5. Run ¼” (6mm) seam up back centre petticoat.
6. Zig zag the seam to finish edges.
7. Try Petticoat on Doll, take pictures with your cell phone and text all your friends. You’re done!!!

Sharon Leamy lives in Thornhill Ontario Canada (a suburb of Toronto). She is a mother of two grown daughters and grandmother of two granddaughters. Sharon volunteers as a seamstress and sews and designs clothes for the Canadian Centre for Abuse Awareness and is a member of the “Heart & Soul” sewers – a group of dedicated and talented women who volunteer their time to make garments for abused women & children which is then distributed throughout Canada.
Other interests include creating recipes for the municipal food network, gardening, doing machine embroidery and working on the annual Turkey drive, coordinating recipients for turkeys at Christmas for families with low incomes.
Thanks so much Sharon for sharing this pattern with us all and I love your sense of humour.
In my Next Share and Tell blog I will also be sharing some photos of a gorgeous wedding dress that Sharon has made, it will be sure to make you go ‘Wow’!
Happy sewing
![]()


